
Where to find it: Admin Panel > Designs > Insta-Rebrand
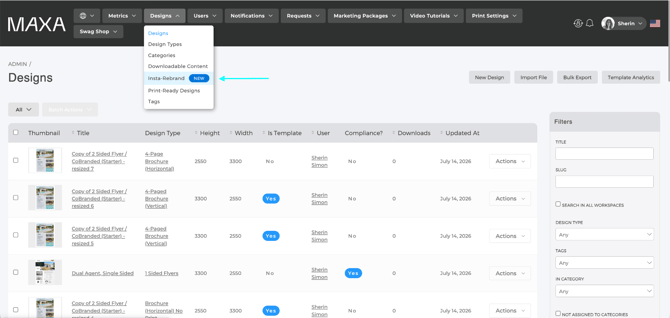
Step 1: Choose Your Scope
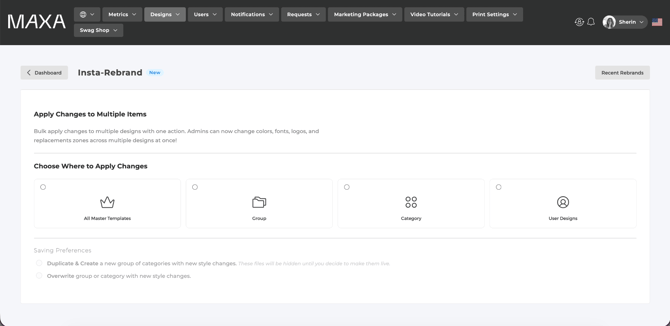
Your scope is where you want the changes applied. Select one of the following:
- All Master Templates: every master template in the account
- Group: all templates in a specific category group
- Category: all templates in a specific category
- User Designs: all designs currently saved on your users' dashboards
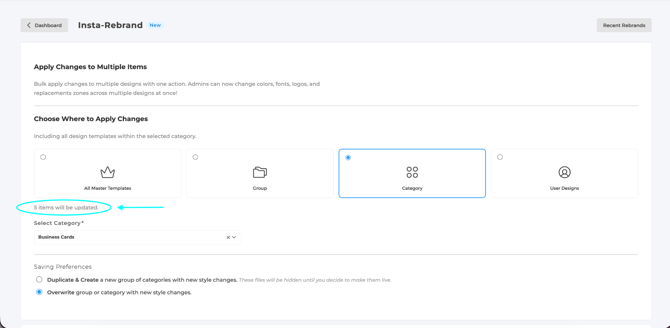
Once you select a scope, the platform automatically loads all the fonts and colors currently in use across those templates. You will see an item count confirming how many templates will be affected.
Note: Switching your scope after you've already started configuring changes will reset the form. You will be asked to confirm before that happens.
Step 2: Choose How to Save
Before setting up your changes, decide how you want them saved:
- Duplicate and Create: creates a hidden copy of the category or group with your new styles applied. The new version stays hidden from your users until you decide to make it live. Great if you want to review everything before anyone sees it.
- Overwrite: replaces the existing category or group directly with your new styles. You'll be asked to confirm before anything is applied. Even with Overwrite, changes are hidden from regular users by default so you still get a chance to review.
Step 3: Configure Your Changes
Expand only the sections you need. You don't have to fill in all four.
Fonts
- Click Add Additional Font to Replace to open a font row.
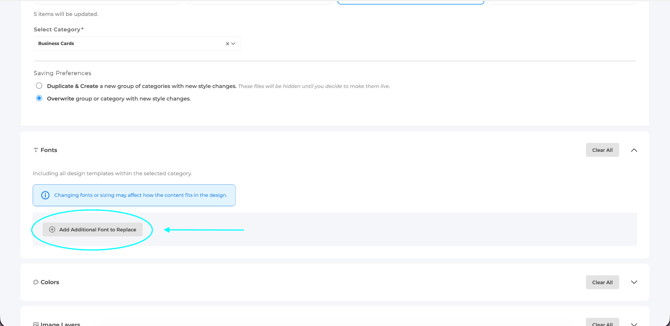
- Original Font: select the font you want to replace. This list only shows fonts currently active in your selected templates.
- New Font: select what you want to replace it with.
- Style, Weight, and Size Multiplier: adjust as needed. Use the size multiplier if the new font renders larger or smaller than the original.
- Target Design Type: choose Digital/Print or HTML. If you're updating HTML templates, make sure to select HTML here since font options are more limited for that format.
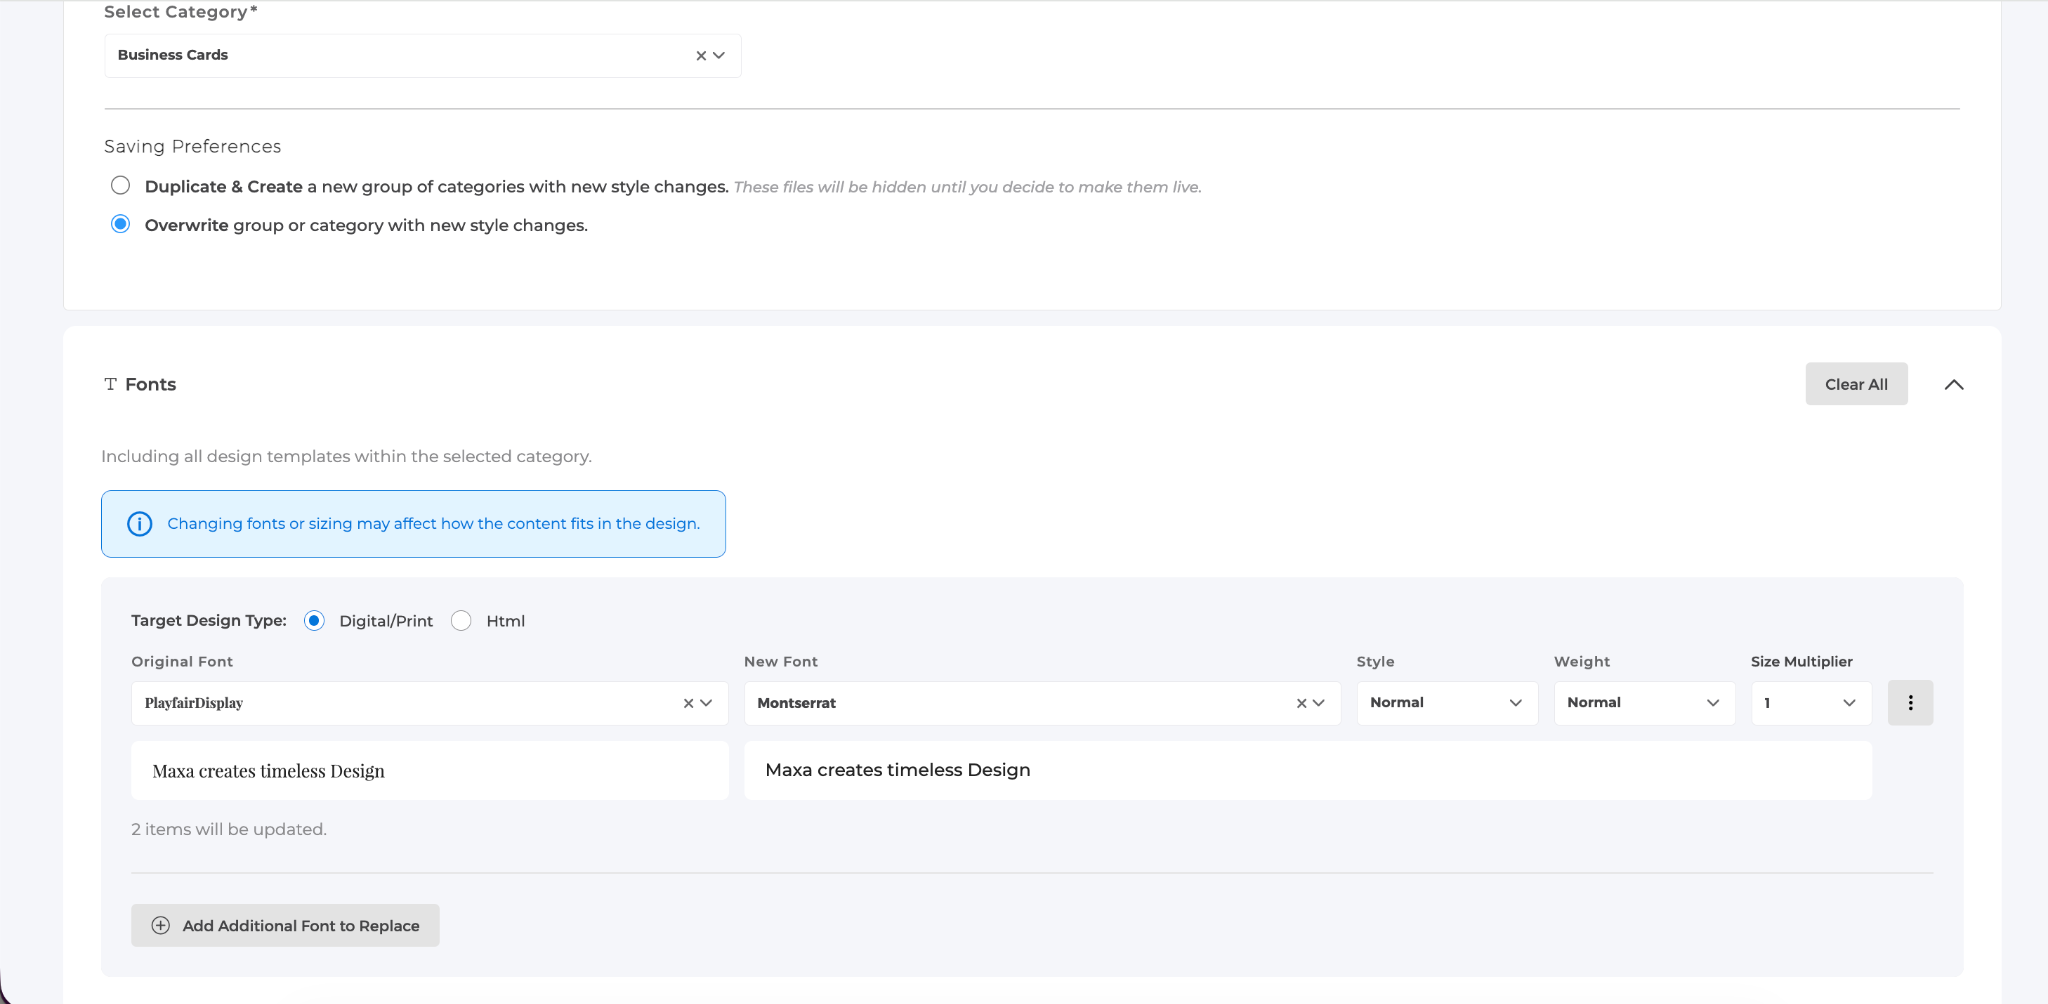
Tip: You can add as many font rows as you need if you have multiple fonts to replace.
Colors
The platform automatically detects every color used in your selected templates. Each color shows as a pair: the original on the left, and the replacement on the right.
- Click any color square on the right side to open the color picker.
- Choose from Standard Colors, Brand Colors, or type in a hex code manually.
- Repeat for any other colors you want to update.
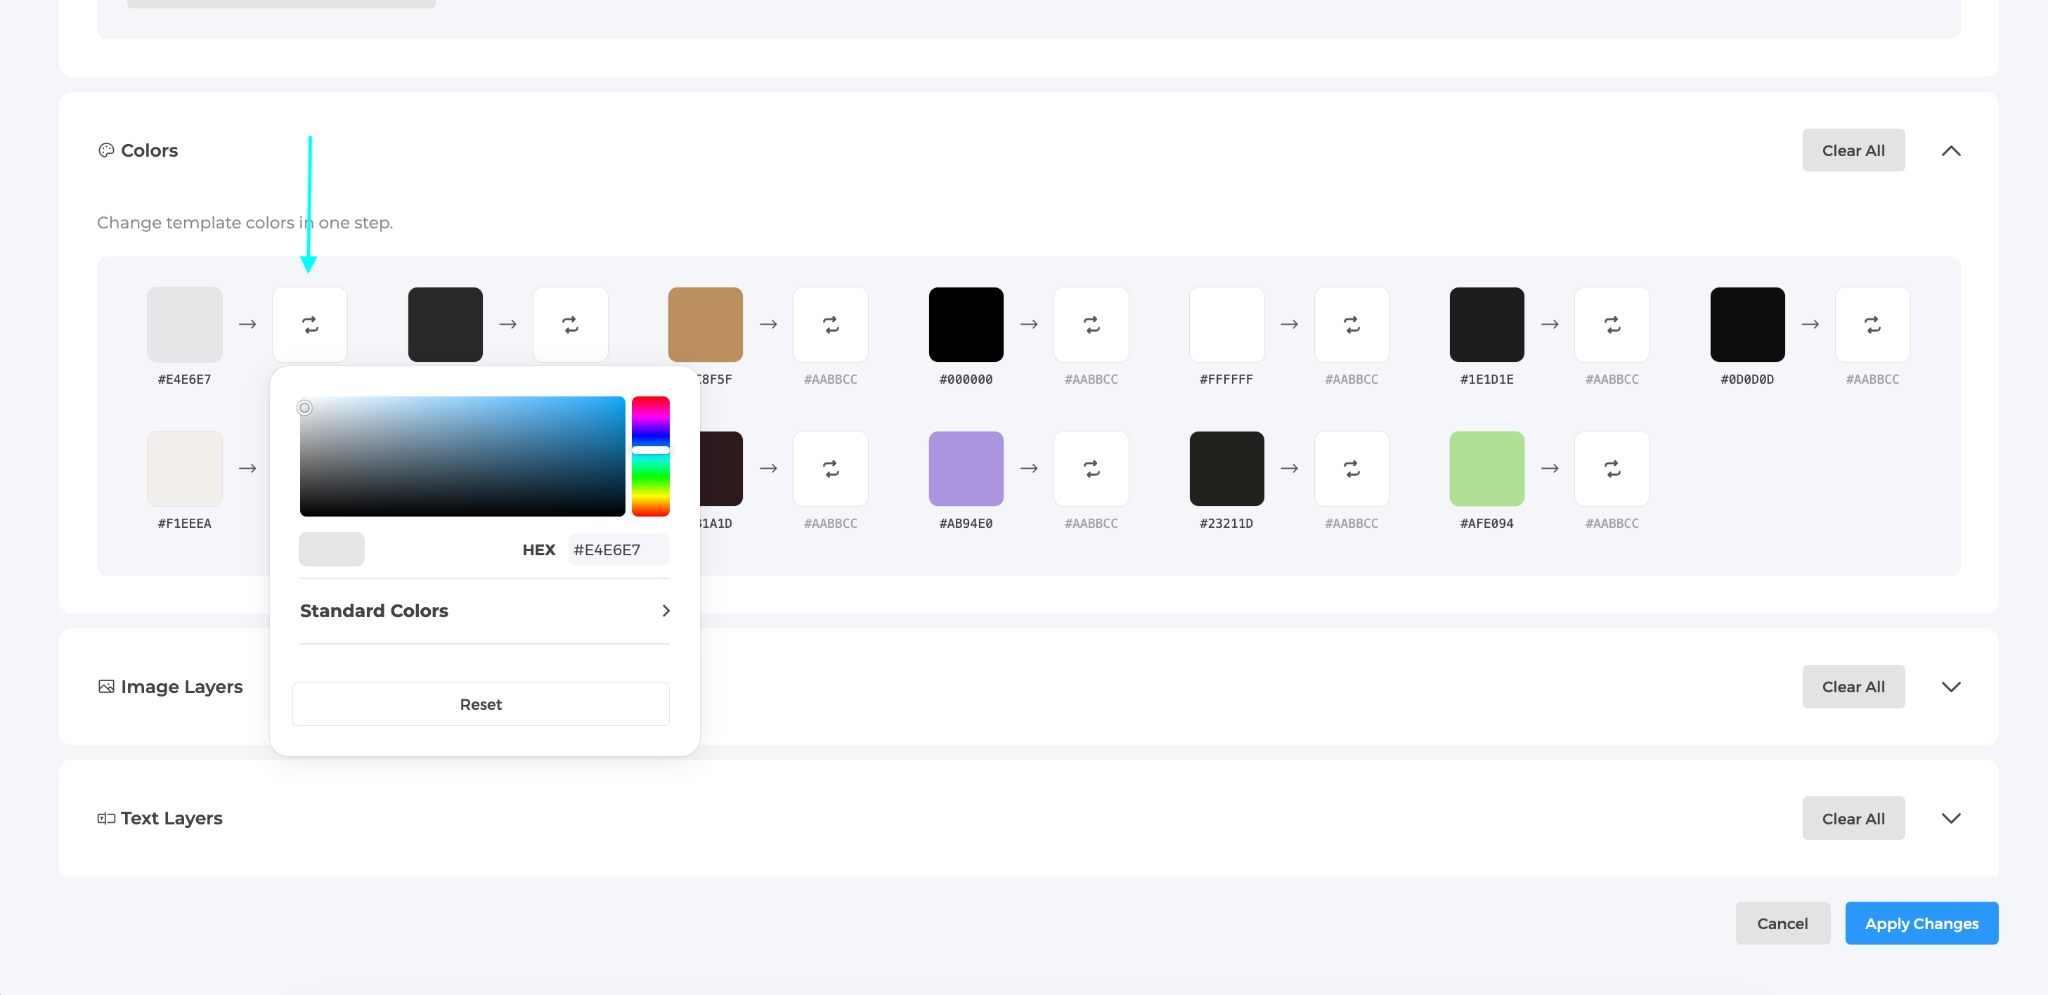
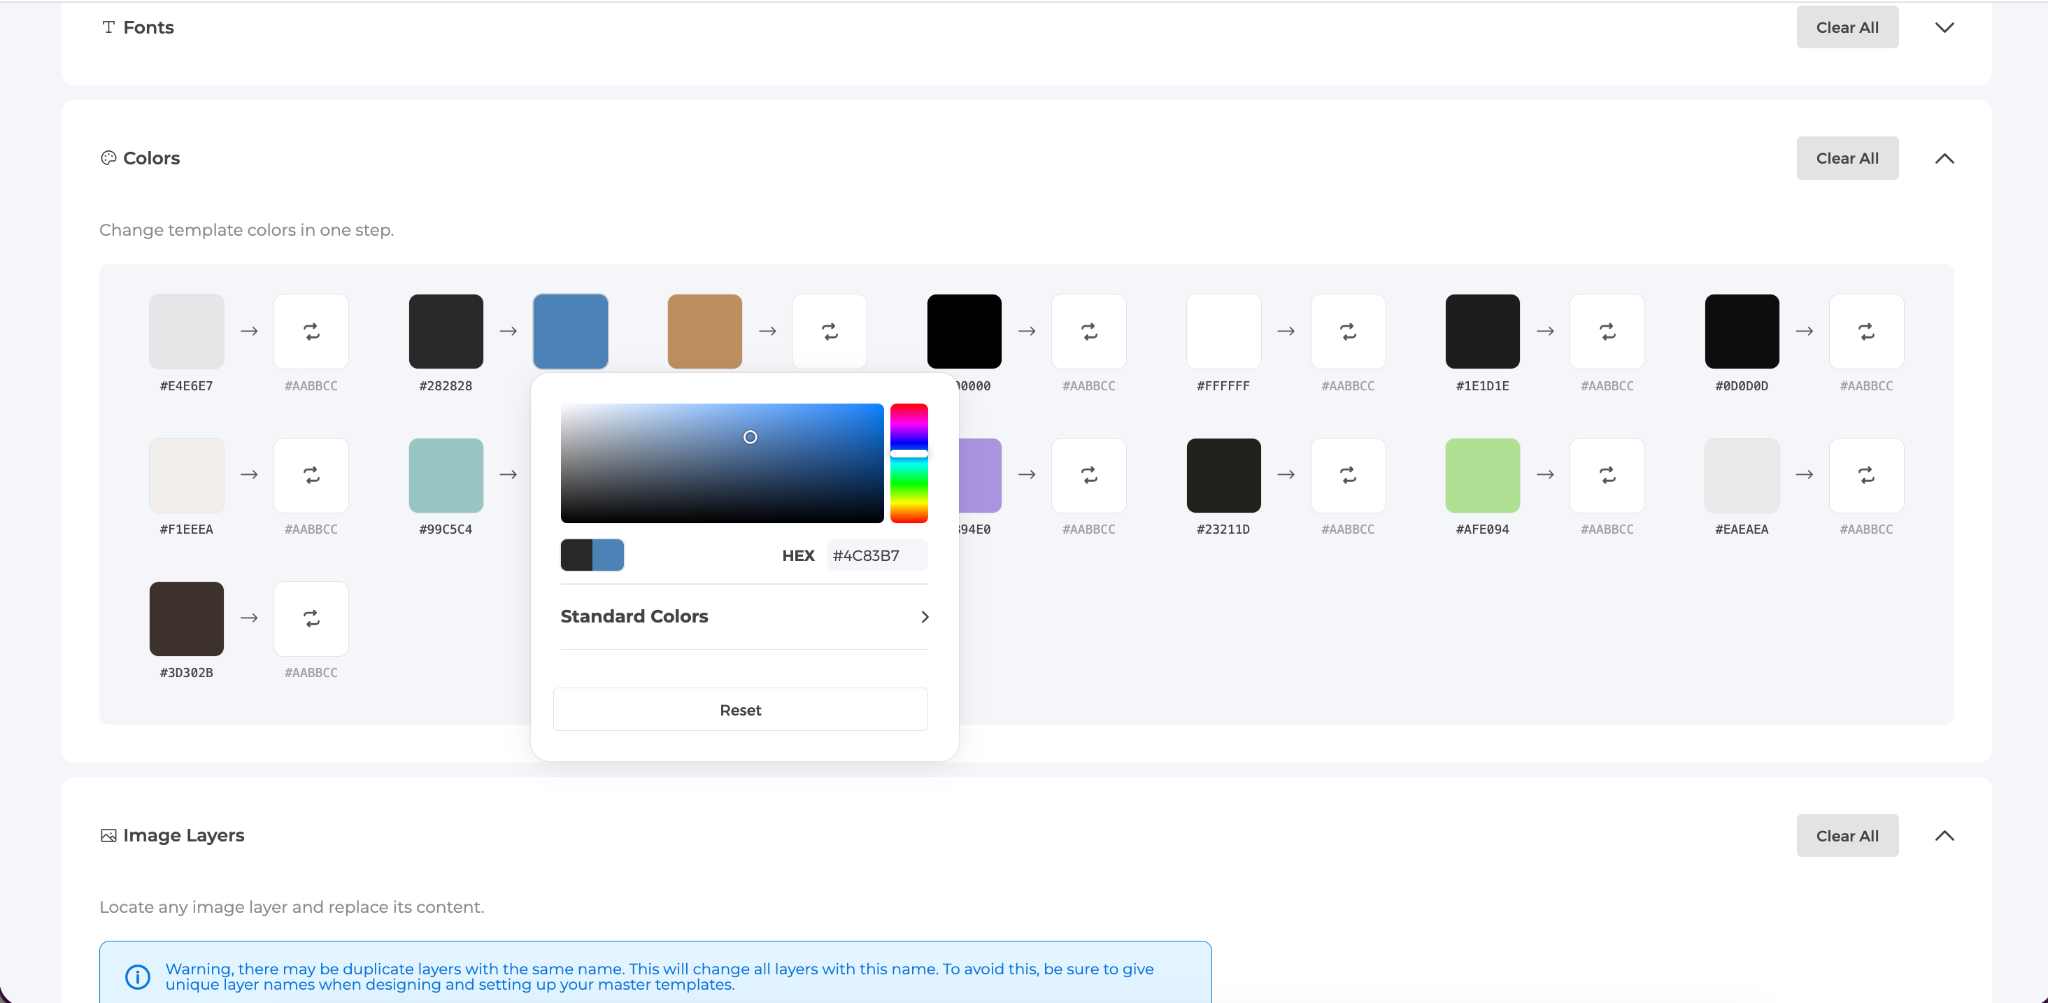
Note: Color changes apply to all elements including text, shapes, and images. There is currently no filter by element type.
Image Layers
Use this section to replace images or logos across your templates. You can target layers two ways:
-
By Smart Field: if the image is tied to a smart field (like an office logo or personal logo), you can swap that assignment here. All layers using that smart field will update automatically.
-
By Layer Name: if the image is not tied to a smart field, search for it by its layer name. The platform detects layer names from your templates automatically.
Once you've selected a layer, you can:
- Upload a replacement image by dragging and dropping or clicking to browse
- Assign or change the smart field connected to that layer
- Delete the layer entirely across all templates by checking the Delete Layer option
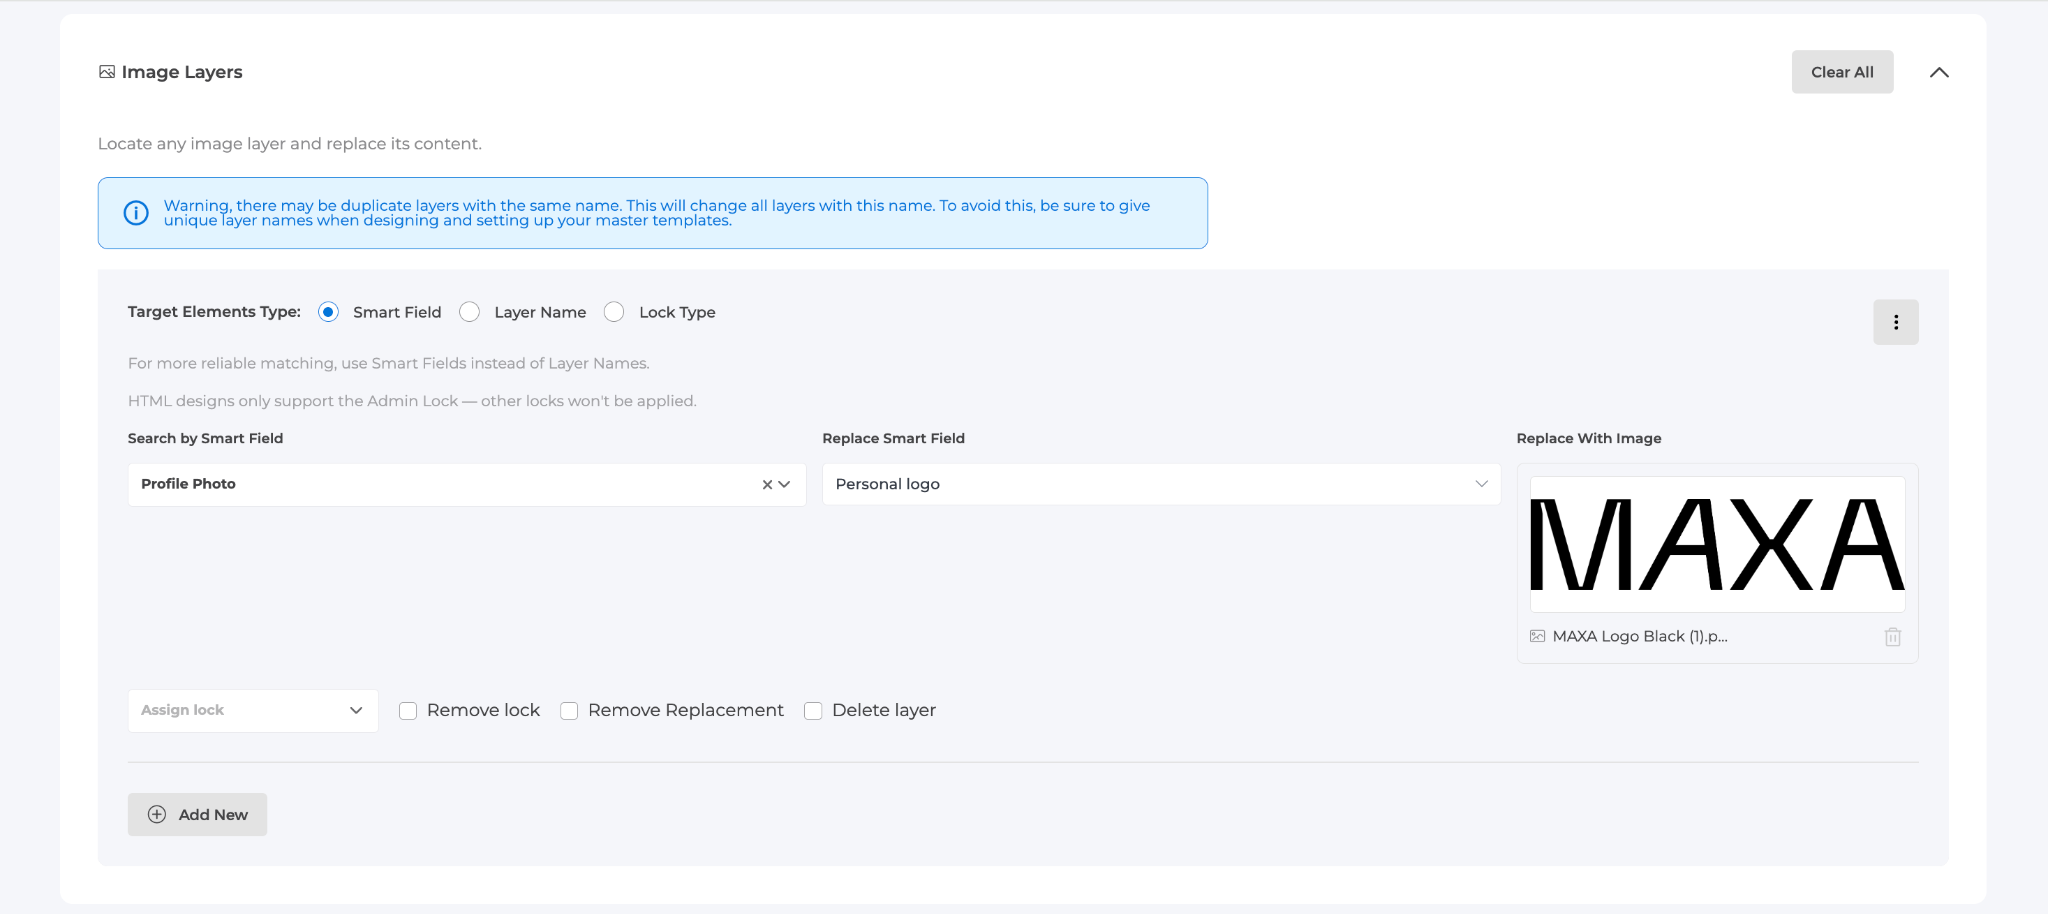
Heads up: If multiple templates share the same layer name, Insta-Rebrand will update all of them. Use unique, descriptive layer names in your master templates to avoid unintended changes.
Text Layers
Use this section to update text smart field assignments or placeholder text. You can target layers two ways:
- By Smart Field (recommended): select the smart field you want to replace, then choose the new one. You can also update the placeholder text at the same time.
- By Layer Name: search by layer name and update the smart field or placeholder text from there.
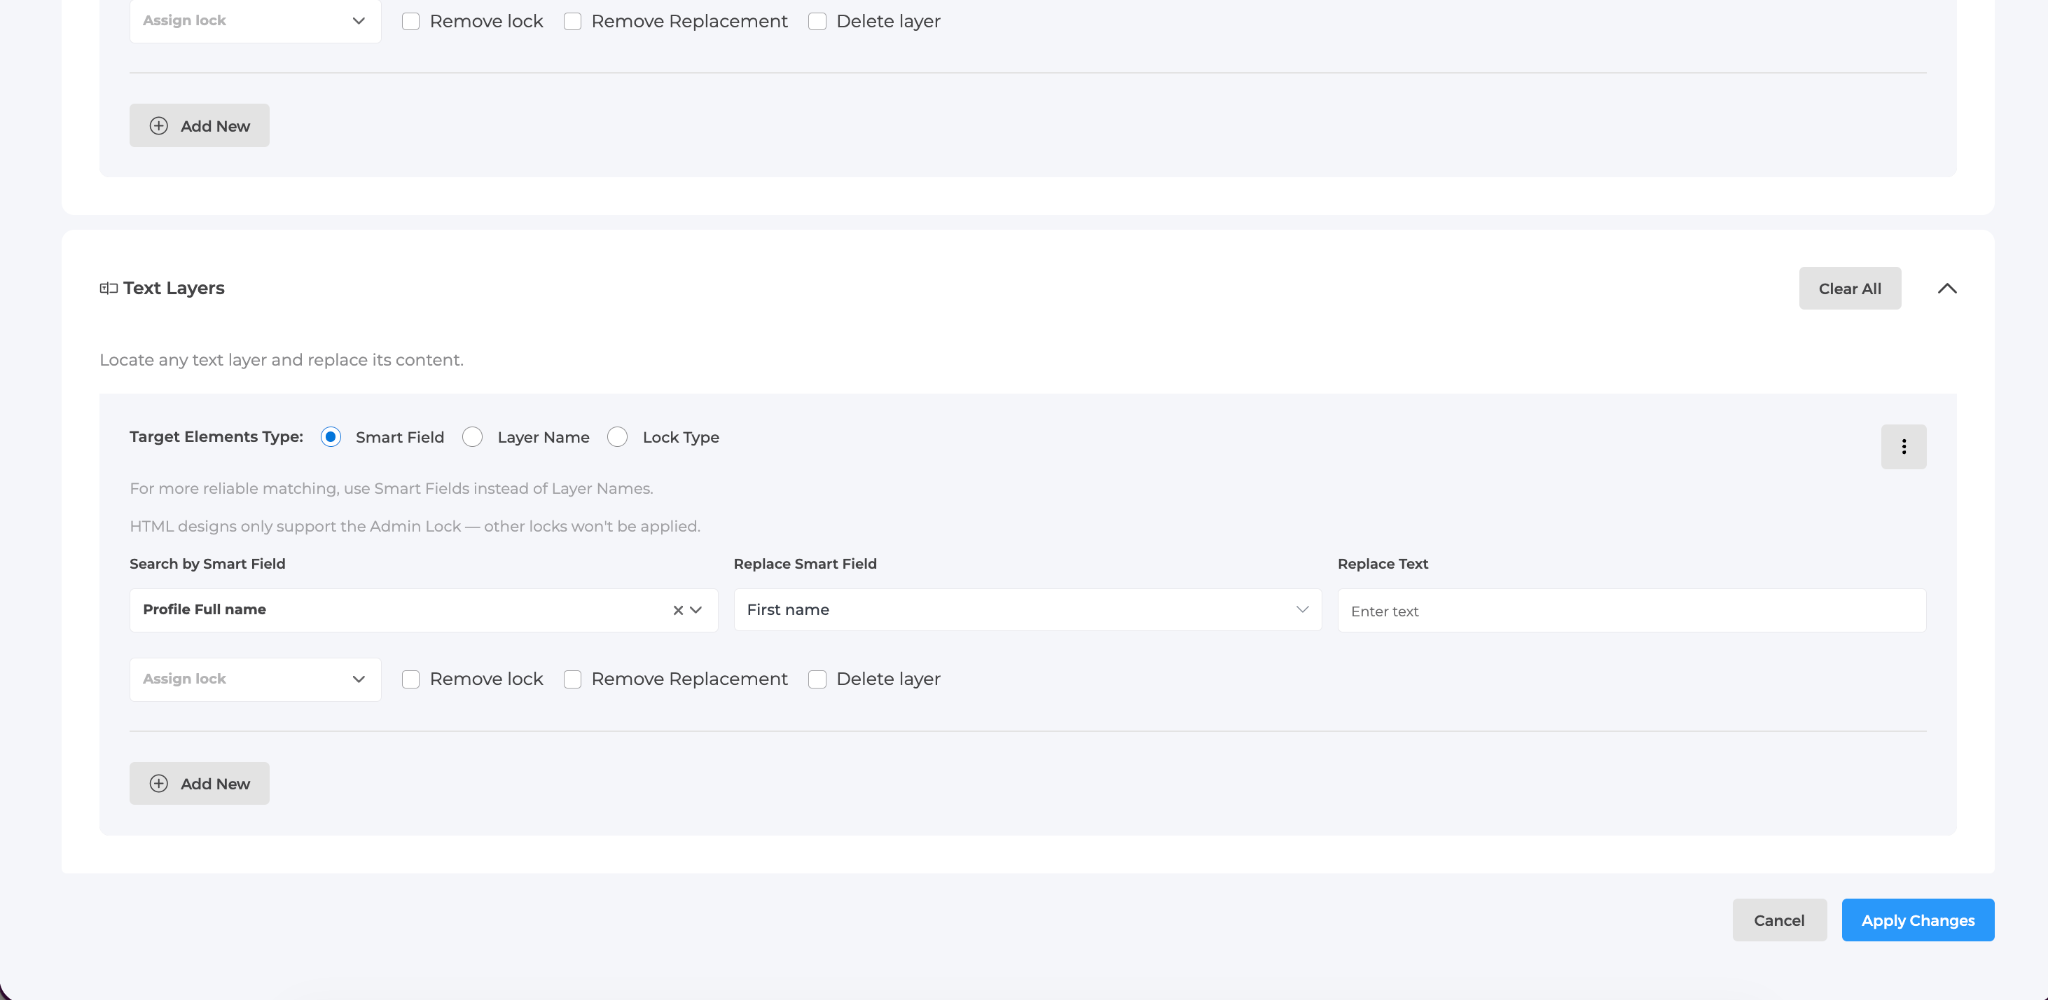
Tip: Smart Field matching is more reliable than Layer Name matching. Use Smart Fields wherever possible.
Step 4: Apply Changes
- Click Apply Changes at the bottom of the page.
- If you select Overwrite, a confirmation screen will appear. Check 'I understand and agree' and click Proceed.
- After confirming, your rebrand will begin processing.
- A notification will appear with a link to track your progress in Recent Rebrands.
Tracking Your Rebrands
Go to Recent Rebrands in the top right corner of the Insta-Rebrand page to see all active and past jobs.
- In Progress: shows active rebrands with a live progress bar. If something goes wrong, the job will show an Error status. Your original content will not be affected.
- Completed: shows finished rebrands with the date they ran. Click the menu on any completed job to view details or revert changes.
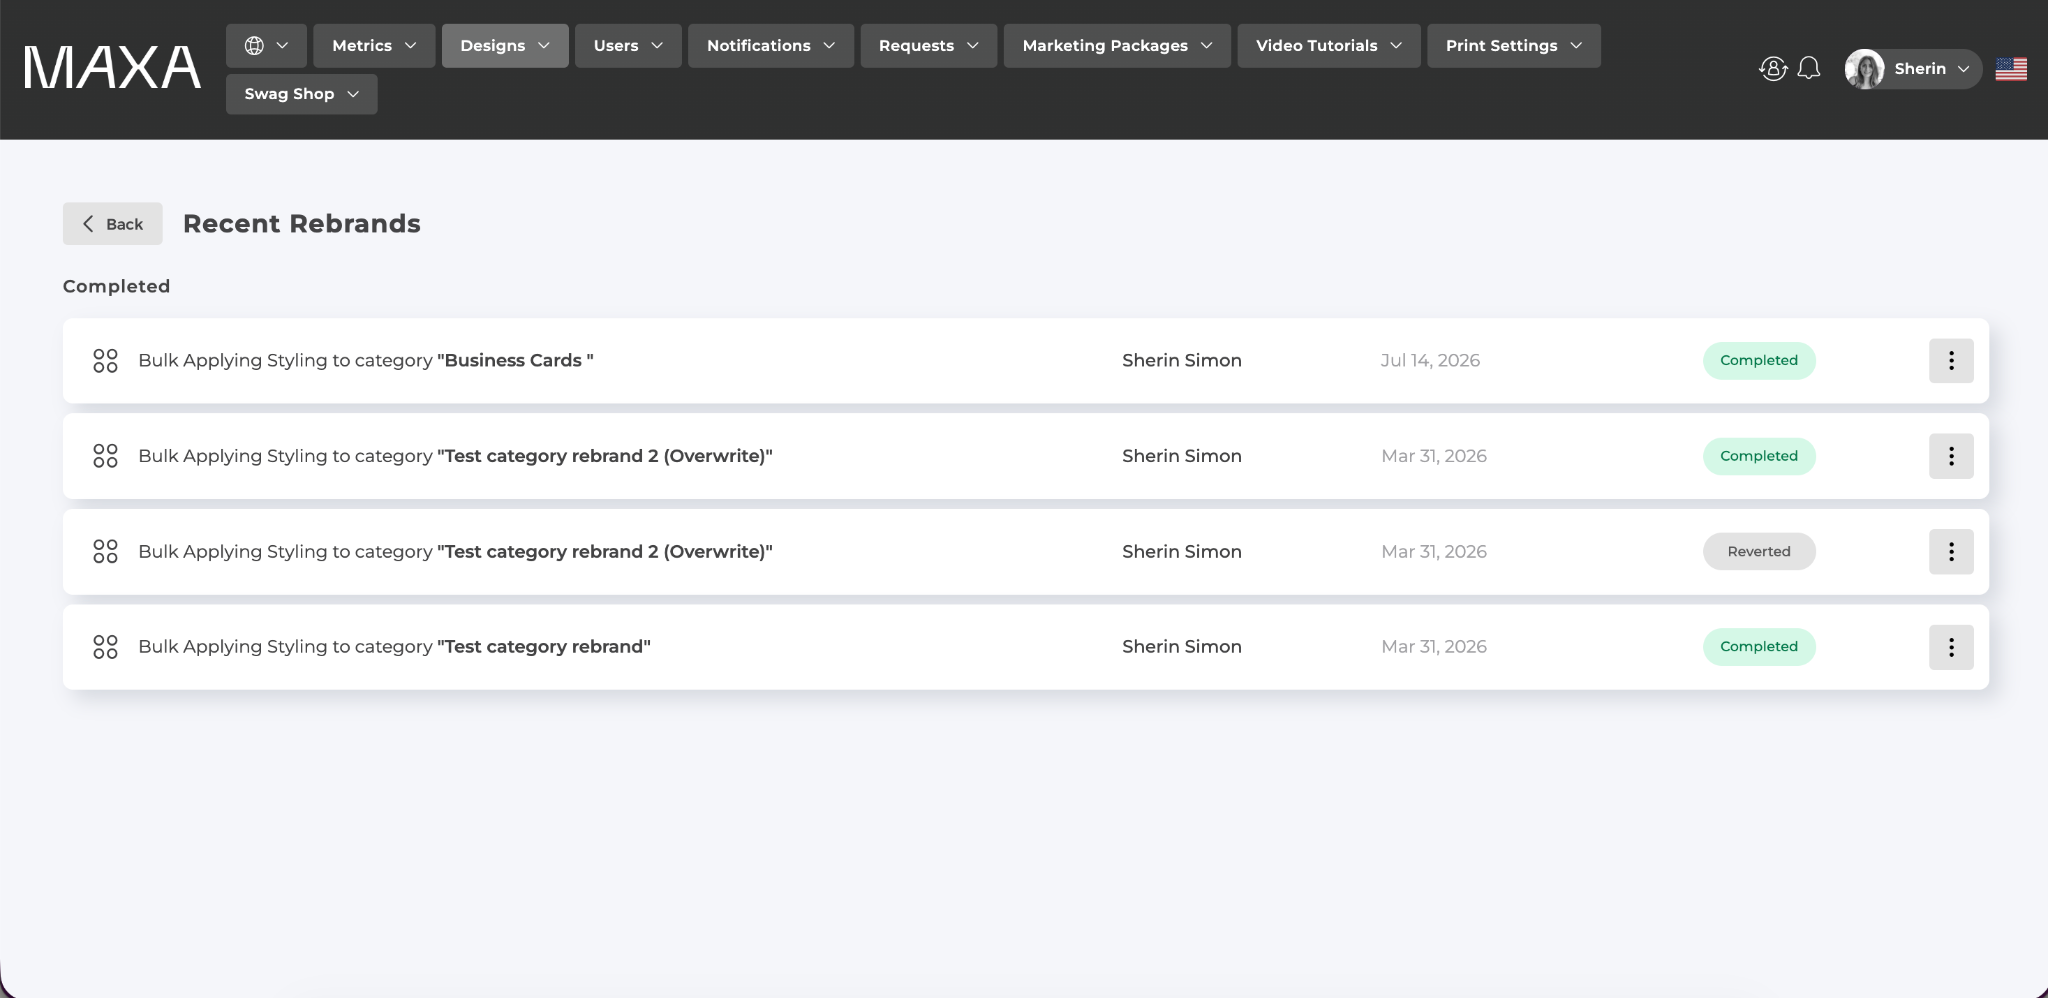
Note: Reverting a rebrand restores all templates to their previous state but cannot be undone once confirmed. There is also a time limit on how long the revert option is available, so check your results soon after applying.
Using Insta-Rebrand with Master Components
Some of your master templates may include master components. A master component is an element such as a heading, text box, or image that stays linked across every design your users create from that template. When a master component changes, that change flows out to all the connected user designs automatically.
Because a master component pushes its changes out on its own, the save mode you choose in Step 2 controls whether a rebrand reaches your users' existing designs:
-
With Overwrite: your changes apply to the live master templates. If those templates contain master components, the sync then carries the change out to every user design connected to them.
-
With Duplicate and Create: your changes are applied to a hidden copy instead. Your users' existing designs are not changed and stay as they are until you publish the copy.
Example: You have a text box set as a master component using Times New Roman. You run an Insta-Rebrand on that category with Overwrite and change the font to Helvetica. Once you apply the changes, the new font updates in the master template, and every user design connected to that master component updates too. Had you used Duplicate and Create, those existing designs would stay unchanged until you publish.
What Your Users Will See
The next time a user opens an affected design, a Component update message appears letting them know their admin made changes. It shows how many elements were updated and lists each one, for example "Heading, Page 1."
From here, your users can:
- Click Review All to step through each change one at a time. Updated elements are highlighted so they are easy to spot, and a small bar at the bottom shows which element they are viewing (such as "Heading, Page 1") along with a counter like 1/2.
- Click Close to dismiss the message and keep working.
Good to Know
- Updated master component elements are locked with an admin lock. Regular users cannot edit or unlock them, so your rebrand stays consistent across their designs.
- A design's dashboard preview thumbnail updates only after the user opens that design. Until then, the old preview may still show.
- Master components work in Designer 3.0 only. Designs that are not on 3.0 will not receive the synced changes.
Frequently Asked Questions
- Can I undo a rebrand after it's applied?
Yes. Go to Recent Rebrands, find the completed job, and select Revert Changes. This cannot be undone once confirmed, and the option is only available for a limited time after the rebrand runs.
- Will Insta-Rebrand change designs my users have already made?
It depends on how you save. With Duplicate and Create, no. Your changes go to a hidden copy, so existing user designs stay untouched until you publish. With Overwrite, a rebrand on a template that has master components will carry those changes out to the connected user designs, and your users will see a Component update message the next time they open the design. Designs that are not tied to a master component are only affected if you use Overwrite and your scope includes User Designs.
- Why didn't my fonts or colors pre-populate?
Fonts and colors only auto-load when you select a Category or Group. If you select All Master Templates or User Designs, you will need to set those up manually.
- Will this affect locked fields in my templates?
Yes. Insta-Rebrand will update the color, font, or smart field of a locked element or text box. Keep that in mind when running a rebrand across templates with locked layers.
- Does it work with HTML designs?
Yes, with one difference. In the Fonts section, make sure to select HTML as the Target Design Type. HTML designs have a more limited font selection than Digital/Print.
- What if a job shows an Error status?
Your original content is not affected. Check Recent Rebrands for details and try again. If the issue keeps happening, reach out to your Maxa contact for help.
- Will my users see the changes right away?
If you chose Overwrite, yes. Changes go live immediately and are visible to everyone as soon as the rebrand is completed. If you choose Duplicate and Create, the new version stays hidden until you publish it.